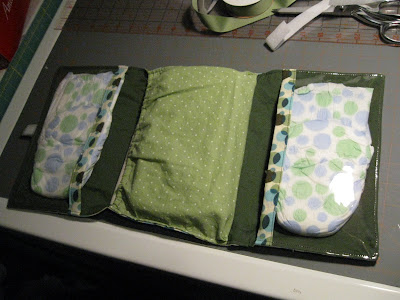
 I have of late much appreciated free patterns and tutorials. So here is another one I came up with that I will share. Anyone is welcome to use it for personal and non commercial use. (you can make it for you, or as a gift, just DON'T sell them) I retain all commercial rights to it. The point is to hold all your diapers and changing stuff in your diaper bag together, so you can just grab a small bundle to change your kid, instead of lugging the whole bag around to the bathroom. Obviously I like the idea, or I wouldn't have designed this one. Enjoy it. Its fun to customize to match with other baby accessories.
DISCLAIMER! I used pictures of two different diaper holders in the directions, so sorry if that is confusing. It is also really hard to explain how to do things with only pictures and words... instead of just doing it, or showing someone how in person. I didn't think this was complicated at all until I wrote directions for it. If you ARE confused, please ask me questions, and I'll try to make the directions better and clear it up.
Supplies:
-rotary cutter, self healing mat and clear ruler (or scissors and measuring tape)
-sewing machine.-two coordinating/contrasting fabrics, 1/3 of a yard each
-matching thread
-clear vinyl, 1/4 yard.
-iron on/fusible interfacing
-10" of 1/4" wide elastic
-sew on Velcro
-8 1/2" x 4 1/2" x 1" diaper wipes traveling case (Huggies.. is the one I used)
optional:
-coordinating 1" wide grosgrain ribbon
-more coordinating fabric scraps for pockets.
-tissue paper for sewing vinyl easier
-clothespins for holding vinyl in place
Cut:
-one 10 1/2" x 20 1/2" rectangle of the main/outer fabric
-one 10 1/2" x 20 1/2" rectangle of the liner/contrast fabric-one 10 1/2" x 20 1/2" rectangle of the fusible interfacing.
-one 8 1/2" x 11 3/4" rectangle of main/outer fabric or other coordinating fabric for the middle pocket
-two 5 1/2" x 10 1/2" rectangles of clear vinyl for outer pockets
-two 2" x 10 1/2" binding strips out of outside fabric or second coordinating fabrics for vinyl pocket edging
Use 1/4" seam allowance unless otherwise specified on this pattern.
We'll start with the inside.
 To make the elastic casing on the middle pocket. Turn over the lengthwise edge 1/4" and iron in place. Turn over again another 1/2" and iron again. Pin and stitch close to the fold as shown.
 thread the 10" piece of elastic through the casing with a safety pin. stitch casing closed on each end, making sure to catch the elastic in place.
 To give the pocket depth we need to add small pleats near each end. (fold the fabric over to make a little pinch) Pinch just enough pleat to match the width of the liner (sorry for the lack of exactness.. I'm not really an exact seamstress, and it doesn't really matter). Line up edges with elastic casing matching the edge of the liner fabric, pin in place. Stitch along the opposite edge of the pocket as shown in both the illustration and picture.
Fold pocket over adding more small pleats close the the corners of each side. Pin and stitch along the sides. (if you want more guidelines as to how big to make the pleats, use the travel size diaper wipes you'll be putting in it as a guide)
 Vinyl pockets
- [1st illustration] sew (no pinning on vinyl) right sides together the binding strip to the vinyl. (tip: sew with the vinyl on the bottom, it will feed through your machine easier.)
-[2nd illustration] turn and fold fabric binding strip along the seam edge.
-[3rd and 4th illustration] Fold twice to make a binding. stitch close to the edge. (edges won't match, wider side with outer stitching is the outside). Repeat for other vinyl pocket.
 Stitch vinyl pockets to liner matching corners. (if you like to pin... use clothespins while sewing to hold it in place instead) (for easier feeding through your machine, put the vinyl on the bottom) Clip curves and trim close to stitching on vinyl only.
 Inside is complete... now to construct the outside.
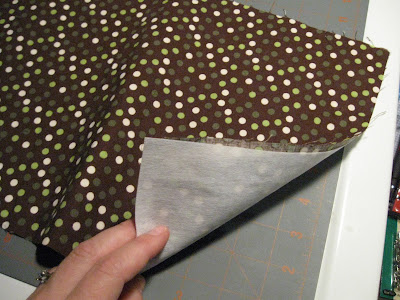
 Iron on fusible interfacing to the outer fabric according to interfacing directions.
 if you are using a contrasting ribbon stitch along the edges of the ribbon down the middle of length of the outer fabric.
Velcro Tab: (two ways shown)
-Cut about 7/8" hook side of velcro, and about 1 1/4" of the soft side of the velcro.
 using ribbon:
cut 3 1/2" of ribbon. Sew hook side of velcro just past the middle of the ribbon. Fold ribbon in half and stitch along the edges of the ribbon.
 or using fabric scraps:
cut two pieces of 2" x 1 1/2" contrasting fabric scrap. Sew hook side of velcro onto the right side of one fabric piece about a 1/2" away from the end. With right sides together sew around three sides of both fabric scraps leaving the opposite end (of the velcro) side open. Clip corners, and turn inside out. (you can stitch 1/8" around the edges for a more finished look if you'd like)

pin velcro tab as shown to the middle of the lengthwise end (velcro side up). Pin soft side of velcro in between 5 1/2" and 6 3/4" along the ribbon (or in the middle) as shown. (To double check correct velcro position, fill liner side with diapers and wipes, pin corners together and fold up, checking velcro closure. Adjust accordingly.) sew velcro and velcro tab on.
 With right sides together, pin liner and outside pieces together (but not on the vinyl part, pins leave permanent holes in vinyl). You can hold the ends in place with clothespins if you want. Stitch with 3/8" seam allowance leaving an opening along the side, large enough to turn inside out. Clip corners paying special attention to the vinyl (very important! otherwise it will be a nightmare to turn inside out). Then trim vinyl only close to the seam.
 turn inside out. Make sure to turn the pockets to the inside, and get the corners tight.
 Pin opening closed, and stitch 1/8" seam allowance around the entire diaper holder. (paying careful attention to making sure the hole is closed and vinyl is flat)
 fill with diapers (it is designed to fit 3 diapers of any size, one per pocket) with wipes and changing pad in the middle. You can buy or make your own changing pad. (You just decide on the size, and cut top, and bottom fabrics and vinyl the same size and sew them together with vinyl in the middle, leaving an opening to turn inside out, and then finishing it with a topstitch just like the diaper case once it is turned inside out)
 fold it up and you're ready to go!