Showing posts with label creativity. Show all posts

Friday, December 5, 2014

#Inktober Giraffe

So, I'm not going to do ALL of my inktober posts.  You can check out my instagram if you want to see them.  I am, just going to blog my favorites.  Probably.  I make no guarantees.   Though I really should blog more consistently.  I'm working on it.  Be patient.  And if you want more, comment!  It helps motivate me.

So, this is my giraffe before digital coloring, with just ink and some orange col-erase pencil. (it scanned in a bit brigher than real life)  The scan looks much better than the dark grainy picture I snapped with my iPod late at night when I finished it though.


and after digital color and cleanup


 I initially didn't mean to put as bright of a background color behind him and was going to tone it down, but it just didn't look as good.  It works really well with him, and it is now one of my favorites.  He's also up in my zazzle shop as prints and bags and tee-shirts and purses and magnets and pillows and a sketchbook and all.  Ok, shameless plug over.  :)  I really do love zazzle though, they have great coupon codes regularly, they have great quality products and they have amazing customer service.  I am my biggest customer, seriously.  I buy more stuff for me than anybody else does.  lol!  It is just so much easier than when I was trying to make etsy work for me.  I may only make a percentage, but it is waaaaay less work and less risk. 

So, how do you like the background?  Too bright?  Too distracting?  Who knows because your monitor is different than mine?  Comment away, I love to have other insight.  I'm still learning with color...


Thursday, October 16, 2014

#Inktober Owl

I have been trying to blog more often, with more of my artistic content.  So, have you heard of #inktober?  It was started by Jake Parker as a way to polish up inking skills.  (He also started the #artdropday).  I took a week long illustration class from Jake at a Writing and Illustrating For Young Readers a few years ago and soaked up some of his genius, at least that was the hope.  He's one of those ridiculously talented/practised artists that can draw so effortlessly that he makes the rest of us look bad.  But anyway, I digress. This is inktober day 1.  With many more to follow.

owl
 This owl is a sort of compilation of a couple of cute owls, and as such is not a specific breed of owl.  He was fun to draw and has a different look then my other Owl that I did in pencil.  (he is very specifically a barn owl)

Ironically an owl was the first thing I drew with that last hashtag media bandwagon I jumped on.  Weird.  Either way, that #365drawing frenzy gave me great fodder to digitally color and turn into nice finished polished pieces later.  And as I seem to sometimes need a push to produce artistic content in quantity, it seemed like a great idea to participate in this one too.  And goes along with my newly defined outlook and identity as artist first, and illustrator of books as an extension of that.  As opposed to primarily and almost solely identifying as a writer/illustrator of children's books.  Of which I have worked on for a long time, but have not published or even tried to publish any thing as yet.  Which was getting really discouraging.  Also since I had an almost single handed focus of working on my dummy book, I was taking hardly any work to a final polish.  I think I was too narrowly focused on a long term goal with very long term payoffs.  So although I will continue to eventually finish and then submit my dummy book, I am going to play at being an artist just for the sheer joy of creating content that I personally like to create and look at and polish my skills in the process. And not limit myself to other possibilities. 


Thursday, August 28, 2014

On the golden section, or when artists get nerdy.


actual Golden Section
Did you know you can get all sorts of nerdy about art?  I mean using ugh, math and all.  I had a class in college that introduced me to the mathematically ideal ratio or the Golden section.  The Fibonacci sequence.  Apparently you can find it in music too, but that is not my forte, so I don't know the first thing about how that works.  I do know you can find it in art.  Leonardo Da Vinci was a big proponent, as was Albrecht Duhrer and you can find it in classical architecture too.  (like the pantheon and stuff..)  And I know there are more, but I'm too lazy to google it right now.


I had an art professor that was pretty enamored of it too, and thus introduced yours truly to the enigma of the golden section.  It was pretty hard to implement though when the only way I had of knowing the ratio was to draw out a fairly complicated geometric drawing.  (I am not describing it here, mostly because I don't know if I remember how to draw it.  It involved a ruler, a compass and a T square.)  A while ago (it was actually waaaaay too long ago to be blogging about it now, don't worry about it!)  I randomly found an obscure site that sold Fibonacci gages that would hold the ratio as you moved it, taking all of the hard work away.  And I had to have one.  I first bought a far too expensive and unexpectedly flimsy one.  After much disappointment I returned it and upon further research I stumbled across an etsy shop that also sold fibonacci gages.  They were smaller, but the owner very sweetly agreed to custom make me a larger one.  Not only did I have a vastly superior and sturdy tool, but it is gorgeous too!


even though its gorgeousness is masked by a grainy picture in poor light..
This is the origin of the 'rule of thirds'.  The rule of thirds is just easier to estimate and describe and thus encoporate.  But really it is just a dummed down version of the Golden Ratio.  Now I just need to incorporate it into my art more.  On purpose instead of accidentally. 

this is an accident.  a happy one of course.


Sunday, May 26, 2013

My origami display solution


I have loved folding origami ever since my second grade teacher Mrs. Maetani at Waterford School (Provo, back when it existed) taught my class how.  And then my big sister went on a mission there and brought me back a huge oragami book in Japanese (which didn't matter, because it is based on pictures anyway).  I was an origami fool as a kid.  Bored at church; origami, bored in school; origami, bored ANYWHERE; origami.  I still love to do it.  My perfectionist tendencies get a huge kick with all the crisp exact folding...  The only problem I ever had with folding origami is that I never had a very good place to put it/store it/display it.  And therefore was reluctant to do it as much as I might have otherwise.  I didn't want them to go to waste (especially if it was with real origami paper, which I rarely had).  Because I'm crazy like that too.  But having recently succumbed to the temptation to buy a fat stack of darling little origami papers and so I now have loads AND THEN I saw these tiny clothespins and voila!  A brilliant solution was procured.  I don't know if others have done this before me and I have just been clueless.  It is certainly simple enough I wouldn't be surprised.  But either way, I figured I'd share it with you.


None of my doorways are safe now.

Monday, February 4, 2013

#365 drawings: Owl 1/365

1/365  Just for fun.. that and my kids love owls.


Day one. 

I debated about lots of this.  Actually committing to do one drawing a day for a year.  (gulp)  If I was really going to do it, where I would showcase some (or not) and other stuffs (that I can't think of now, but it seems there should of necessity be more to list).  Mostly my fear of public commitment, and my knowledge of my flaky self.  I know it will be good for me, I need to be more productive with art.  I've never been prolific at drawing, I am too critical and perfectionistic to churn out loads just for the numerical quality.  So I knew it would be good for me to break out of that box.  And it would be a chance to draw just for fun, and not for illustrative book purposes.  To remember that I love to do it.  Not that I don't love it when a drawing/illustration is going well.  I wouldn't do it (or have gotten this far, which isn't very, but for me, it is) if I didn't like it.  But there is a lot less pressure when the drawing is just for drawing, and nothing else.  And if I don't like it, I (probably) won't show it.  And I don't want to be consumed by it (I am already bad at general house upkeep anyway, and have a half a trillion partially completed sewing projects not done) but it really will be good for me.  And my billionth new attempt at a new schedule/self discipline.  Because my grown-up-ness is broken.  (Which I recently surmised from various sources I can't be bothered to remember now may actually be RELATED to my being a creative person, which is an interesting idea, and helps me be less guilt ridden)

And I may actually have incentive to post these and not half finish them to sit and rot in my unpublished post box.  Like so many others...  (there are lots currently about apathy, and such which, shockingly... are so pathetic I can't and don't even want to finish them.)

I've sort of been in a dark place.  A self discovering place.  But not a very nice to myself, want to share how pathetic I've been feeling sort of place.  Even though that can be helpful to others and healing and such.  I'm not always that brave.

Enough of that.  I am getting super off topic.  And I am determined to NOT go back and meticulously edit the crazy out of my posts (or not, and therefore not publish them).  So I had better stick to my reason for posting.  I am very scared of doing this.  And I don't like to be a follower... (I'm a self proclaimed antiestablishmentarian)  So it really isn't like me to jump on the bandwagon.  Even someone who I admire.  BUT that is a stupid excuse to not do it.  I realize I actually don't use my blog much to showcase my art (I am really actually pretty shy about my art, I know it probably doesn't seem like it, but it freaks me out to share it) at least as much as I could.  Partly because I haven't bothered to learn the "rules" about what I'm expected to know about unpublished disclosure and blah, blah, blah.  So I don't know if I'm shooting myself in the foot by showing off art that may later want to be copyrighted by a publisher...  ANYWAY.. going off topic again.  The other reason I'm reluctant to share more art on my blog is I get compulsive about checking the comments (or usually lack thereof) and care way too much about other people's feedback then I have any right to.  Basically I am way more insecure than I should be.  Especially when it has to do with my art.  There you go.  Full nekid disclosure.

But in the vein of not going for perfection and not having this take over my life, neither the drawing or the writing in these posts will be cleaned up and/or picked over incessantly.  I'm not even going to scan the drawings (unless they are illustrations which I'll use later) just take pictures of them.  (Blast that crummy instagram is too snotty to let those of us "losers" without smart phones play their exclusive game.)

Which is WHY then I should fight my fears and do it anyway.  So I am.  Wish me freakish luck.  I desperately need it.

Saturday, December 22, 2012

Merry Christmas Lovely Blog Readers: free printable gift tags

Tip: If you make a present pretty enough, it negates the fact that you just wrapped up a package of socks and tried to pass it off as a real present.  Muah, Ha Ha!

 So, I've been on somewhat of a Christmas gift tag making binge this year (who knows why.. maybe because I have never made nice printable ones before).
 
And maybe I was a little inspired by my good friend Julie, who made these ADORABLE tags that I snatched up at the school craft fair.  
 Because when I have lots of projects hanging over me, I think of more, and less urgent ones to do to procrastinate the ones that are harder.  I'm brilliantly stupid and efficient like that.  (oh yeah, and I can't work on secret things when my kids are awake anyway)  First I started with (shhhh) some darling ikea wrapping paper owl designs that I totally just scanned in and digitally filched Ikea's artwork.  For non-commercial purposes... but still my conscience was miffed at me.  Because its not like I don't have artwork I can use... so I made up some Ted ones and printed four of them on label paper (4x6), so I could turn them into sticky tags. 
Freaking cute owls Ikea.  Well played.
Then for some stupid reason, I thought I needed a whole NEW design to print on cardstock for hanging tags.  Why, I do not know.  My brain gets broken when it has too many things to do.  Plus when I do make nice tags, I have always drawn a quick holly and berry sprig on each tag.  So... the thought was to do a really nice prismacolor version that I'd scan in and use forever.  You know, being lazy and all.  So I did. 
But after I printed them all out, I realized that, silly me, I could have used the Ted ones on different paper (and different layout, which I had to do anyway).  (But I guess nice to have one that was holiday themed anyway.)  Yeah, lets just call it Christmas brain, instead of temporary idiocy.  But since it is an image that only works for Christmas, and took me a scant afternoon to do, and I already did all the effort for me, and I'm in the giving spirit... why not give it away?  So I am.  You can have it.  I mean, for personal use.  If you sell it, or re-use my image or change it or take off my copyright, that stealing.  And, rude!  But you won't because you are a nice person.  So, Merry Christmas!!! 
layout/format is for a standard size (8.5x11) piece of paper/labels/cardstock

Tuesday, December 18, 2012

Homemade Christmas Present Roundup Vol. 1

These are a smattering of presents I have made in years past.  Not to brag, but to share ideas.  Some were made from others tutorials, some I just improvised and some are both: tutorials that I have improvised on.  (Note: the captions are links to the tutorials..)  Happy present making!

DVD travelling art kit


No tutorial for the capes.  Just a hemmed rectangle of fabric, with an elastic casing at the top, and a craft foam applique.  Really easy.

Lunch Money Cuff tutorial: Lemon Squeezy Home

bowtie: Lemon Squeezy HomeHat: Sew Liberated

Wall-E instructable, EVE instructable.  Both modified
I know I have more... but I figured I would publish this now, and find more later. Instead of saving this as a draft yet again, because I don't need any more unfinished posts.  Thus the vol 1.  Maybe I'll get around to vol 2 this year, maybe not.   If you ask nicely I probably will though!

 (You can also check out my other tutorials..)

Friday, November 23, 2012

Tutorial: Upcycling cereal boxes into carboard mailers

This is so easy I can't believe I haven't thought of this before.   It is brilliant if I do say so myself.  I wish I had thought of this when I was bothering with all of the promotions and whatnot to get a tiny bit of sales with my etsy shop.  Though they will be useful for the new printing run I'm doing of my Ted book.  Just in time for the season of gifting and shipping everything.  Either way I am super happy that I found such a great use for the waste from the grotesque amounts of cereal my children consume.   I will certainly never need to buy another small mailer again! 


See, totally easy!  I know I'm going to be using them from now on.  Are you?

Tuesday, November 20, 2012

Kid Project: Upcycling old broken crayons into swirly coloring sculptures

I did this last year with my kids for their friends, and since it was for gifts, I didn't blog about it then.  That and I'm pretty awful about blogging.  But in honor of the upcoming gifting/making/shopping madness, I wanted to get more homemade gift ideas out there and in my tutorials.  So, this random post which was half written (and of course not finished) was dug gingerly out of the pile of my squandered molding ideas, and with a little spit polish here and there, I present it to you for your crafting pleasure.

These were from candy pretzel molds, so I had to tape up the end so the wax wouldn't run out, but overall it made a great shape for coloring with.


Upcycled Fancy Crayons

Step 1: Peel old crayons.  (kid step)  Perfect job for kid helpers.  You (the adult) can make it easier by taking an exacto knife and cutting through the length of the crayon paper wrapper.


Step 2: Sort out the colors into like piles.  (kid step)  I used a ton of leftover crayons, all different brands.  Some of which had different wax and sparkles and whatnot other components, so it wasn't all totally homogeneous.  Not the best thing, so I would suggest maybe sticking to the same brand.  It still worked though, but next time I think I'll go with all the same sort of crayons.

Step 3: Melt them double boiler style.  (adult job)  You can use a variety of things for this purpose.  But just know it will probably ruin whatever container you use.  So think recycled.  You can start collecting rinsed out tin cans, or I used glass baby food jars.. anything that isn't going to melt with the crayons.  (don't use anything plastic)  And put them in a shallow pot of boiling water.  Make sure the water doesn't go into the crayon containers.

Step 4: Pour the molten wax into molds.  (adult job)  Use tongs or oven mitts or something, because I guarantee whatever you used to house the molten wax will be super hot.  Be careful when you pour!  You can use all sorts of different molds to shape the wax.  I used candy molds this time.  But you can use old ice cube trays, or muffin tins, old prescription bottles or even hollowed out egg shells.  The possibilities are really endless.  (you could get real fancy and make plaster casts of objects and fill it in with wax..)  I also like to swirl and mix two or more colors together.  I try to stick with colors next to or close to each other on the color spectrum (or mix with neutrals, white, brown, greys and black) to avoid really ugly combinations, like what happens when you mix complimentary colors that cancel each other out.  Because they will mix up a bit.  The mixing colors is my favorite part.  Go crazy and have fun with it though!

Step 5: Cool them off completely.  Cool off in freezer (where the wax will contract, making it easy to pop right out of the mold!)


Step 5:  Remove from the mold and color.  (kid step)  Make sure it is totally cooled off and cold, and not even slightly warm at all.  If so it should come right out and be ready to color with!
re-purposed glass baby food jars work great for gifting and/or storage (as well as for melting) can you tell I did this when Liam was still eating baby food?

 There you go!  Enjoy!  It is really fun, and they make fantastic gifts.  If you want more gift making tutorials let me know!

Thursday, May 3, 2012

Tutorial: Pacifier Clips

I imagine that there are probably half a million of these tutorials out there..   But I thought I'd share this one because it uses fabric and not ribbon, and snaps and not velcro.  I needed something for my baby boy Liam, and since the ribbon I keep on hand isn't masculine, I came up with this.  It also uses up tiny scraps of fabric, of which I am a fan of.  Which means you can match it to baby stuff you've already made.  The clips are suspender or mitten clips, and the snaps are going to be close to them in the notions section of a fabric or craft store.  So, here you go.


You can use this to make pacifier clips however you'd like (personal and commercial) but if you use my pictures link back here or otherwise give me credit.  Enjoy!

Wednesday, September 14, 2011

kid project: growing sugar crystals

My kids are on a crystal kick such as the world hasn't seen since the early 90's.  Theirs runs more towards the cheaper plastic sort, but nonetheless just as crazed.  I thought I'd show them some real crystals.  They aren't too impressed by small ones we found in rocks, so I thought perhaps we could make some bigger ones.

Fortunately a while ago I scored a sweet Goodwill find of "How Science Works" and bequeathed it to my oldest filled with fantasies of doing science projects together and being that cool sort of Mom.  Then I got all nerdy and explained it all before we did it.

this is how:

1- we heated up water and slowly dissolved sugar into it until it wouldn't dissolve any more, and then we should have added a tiny bit more water so that all of the sugar would have dissolved and not acted as seed crystals all over the bottom of the jar.   ..and added blue food coloring

...BTW, this is AFTER the solution has sat and been poured out.

2- we poured the super saturated hot sugar water/syrup into a jar and hung a rough string (we used hemp because it was laying around, you could use yarn) into the jar (not touching the sides or bottom) 

3- waited.  Patience isn't a strong point in children, but they held off for two whole days while we were growing a seed crystal. 

3- we took the largest seed crystal (that Lucy didn't eat) from off of the rough string and tied it to a nylon string (fishing line works) and hung it from newly resaturated sugar solution. 

And then whilst on vacation, we grew bigger ones.

Saved the biggest ones in cool origami-sticker boxes, and happily ate the rest. 

They taste like little naked nerds. 

Monday, September 12, 2011

On patched jeans and other atrocities

I can't decide if this makes me a nice, loving and clever Mom, or a total dork Mom (or probably both).  But I am really bored with jeans being rendered useless after a month because my kids are.. well, kids.  Their knees are constantly hitting pavement, trees, carpet, furniture, gravel, you name it and surrendering their thread count.  I hate waste, and not so much in the trendy, crunchy, reduce your carbon footprint kind of way, but a deep mental aneurysm sort of way.  Call me cheap, or a tight wad, whatever you want, because its true.  But just don't throw something salvageable away in front of me.  I'm probably only saved from serious hoarding by the fact that I'm not a big shopper.  All mental issues aside though, I've officially declared war on the pesky lower appendage ventilation duct.  In honor of the weather starting to cool off I pulled out last years leg wear in all its tattered glory.  And then got busy.


Trying out new ideas all in the name of erring on the clever-mom I-did-this-on-purpose side as opposed to the point-and-laugh-at-the-dork-kid look.


now there are
Since discovering HeatNBond *cough, stupid name I am now re-in-love with appliqué.  And no, I am not being paid for giving them a blog shout out.  And since I was in a blog stupor at the time of the frantic baby-sewing, there are no pictures of said appliqué-love.
all two of them


I also recently started working as a sewing assistant for the incredibly talented fabric/pattern designer/artist  Sandi Henderson.  So I've matriculated back to some sewing projects, having sewing on the brain, but my Ted book illustrations are still forthcoming. 

Wednesday, June 22, 2011

Hemisphere Wars

My creative beastie is sick and tired of table scraps and wants something substantial to masticate, and is fed up with all of my measly little sewing projects of late. So, my left brain has had to toughen up and put the smack down on its cranial counterpart. My right brain protests vehemently that it is being unfairly stifled, and that structure is so boring! (in that awful high pitched whiny voice that kids are so proficient at). And my poor corpus callosum is stuck in between as the bedraggled referee.
The fact remains however that unless I schedule and organize my sorry tush, I don't get nearly enough (or any, lately) illustration done. So with my dominant hemisphere kicking and screaming, I dutifully cleaned my cluttered house, paid the depressing bills and cracked open my dusty planner and set me some schedule to illustrate more. Nice stiflingly specific goals with deadlines and all. (ok, ok, loose deadlines... right brain put up quite the fight and threatened to strike if things got too stringent)
Soo-o, I'm going to finish (yes, really) the Ted the Hamster book my sister Meg so cleverly wrote and gave to me to illustrate all those eons ago. Its been disgustingly close to completion for way too long. The plan is to print it out myself and hand bind it. It will have both hardback and paperback versions. And I'll be selling them through my decrepit etsy shop. And if my kids have any say in it, a Ted the Hamster plushie may show up there in the future (they really want one, I'm not horribly keen on it, so we'll see). Meanwhile I'll also keep plodding along with my "Cora's Perfect Pet" dummy book in preparation for its sacrificial offering to a endless ocean of potential publishers and multiple rejection letters. Hopefully little and consistent bits at a time will keep both beasties at bay.

Tuesday, May 17, 2011

sketches of my kids..


Illustrating my book has been greatly neglected of late. Not without good excuse, I've been rather occupied with gestating and then recovering from the birth of my newest little darling boy Liam. The latest sketching started when Lucy fell asleep a while ago on the couch, a
nd looked so stinking cute it inspired me to draw her. Whenever I draw my kids, I always wonder why on earth I don't do it more often. It doesn't take much time, and I LOVE the results (I mean as much as I love anything I do that I can still totally pick apart, because its not perfect). It is however nice to have NOT done them on scrap paper at church, like half of the drawings I do of my kids.

Then of course Max wanted a picture of himself, and so he willingly posed, which I then took full advantage of.

Sohvi was the best at holding still, and I really like this picture of her. Though none of them are fantastic representations...

Liam, even sleeping wouldn't hold still for anything, so its not very good at all, but oh well. (and my scanner sometimes sucks and leaves gross dark borders on the sides..)

Thursday, April 14, 2011

messing around with watercolors..

My kids inspire me to play around in art just for fun, which I should do more often. I think I can take it too seriously, because with my book illustration I need to to a certain extent. But it can be bad because I scare myself away with self intimidation. These were done while watching Conference. Some I like more than others, but I'm including all of them just because. (maybe to show not just my favourites, but the mediocre stuff as a contrast..) I honestly never know what is going to turn out.


I started out n
ot liking the leaf.. but kept messing with it and coming back to it (which most of the time with watercolors will just make a mess) and I ended up liking it a lot. Leaves are a rather re-occurring theme in my art. I think they are beautiful, and are somewhat symbolic for me of the beauty and intricacy of creation.
The baby nasal aspirator ironically turned out une
xpectedly well despite the subject matter. Unfortunately it IS an indicator of the condition of my baby's nose..

The apple and orange are rather.. um, just meh. Underwhelming. But they were simple objects already... so their lack of detail isn't a problem, as much as they were boring still life subjects to begin with. Blame my kids, they were their snacks.

All in all though just very fun to mess around and have fun with art for no particular reason at all.

Monday, April 26, 2010

Tutorial: Diaper Holder Changing Packet

I have of late much appreciated free patterns and tutorials. So here is another one I came up with that I will share. Anyone is welcome to use it for personal and non commercial use. (you can make it for you, or as a gift, just DON'T sell them) I retain all commercial rights to it. The point is to hold all your diapers and changing stuff in your diaper bag together, so you can just grab a small bundle to change your kid, instead of lugging the whole bag around to the bathroom. Obviously I like the idea, or I wouldn't have designed this one. Enjoy it. Its fun to customize to match with other baby accessories.

DISCLAIMER! I used pictures of two different diaper holders in the directions, so sorry if that is confusing. It is also really hard to explain how to do things with only pictures and words... instead of just doing it, or showing someone how in person. I didn't think this was complicated at all until I wrote directions for it. If you ARE confused, please ask me questions, and I'll try to make the directions better and clear it up.

Supplies:
-rotary cutter, self healing mat and clear ruler (or scissors and measuring tape)

-sewing machine.
-two coordinating/contrasting fabrics, 1/3 of a yard each
-matching thread

-clear vinyl, 1/4 yard.
-iron on/fusible interfacing
-10" of 1/4" wide elastic
-sew on Velcro

-8 1/2" x 4 1/2" x 1"
diaper wipes traveling case (Huggies.. is the one I used)

optional:
-coordinating 1" wide grosgrain ribbon
-more coordinating fabric scraps for pockets.
-tissue paper for sewing vinyl easier
-clothespins for holding vinyl in place

Cut:
-one 10 1/2" x 20 1/2" rectangle of the main/outer fabric
-
one 10 1/2" x 20 1/2" rectangle of the liner/contrast fabric-one 10 1/2" x 20 1/2" rectangle of the fusible interfacing.
-one 8 1/2" x 11 3/4" rectangle of main/outer fabric or other coordinating fabric for the middle pocket
-two 5 1/2" x 10 1/2" rectangles of clear vinyl for outer pockets
-two 2" x 10 1/2" binding strips out of outside fabric or second coordinating fabrics for vinyl pocket edging
Use 1/4" seam allowance unless otherwise specified on this pattern.
We'll start with the inside.
To make the elastic casing on the middle pocket. Turn over the lengthwise edge 1/4" and iron in place. Turn over again another 1/2" and iron again. Pin and stitch close to the fold as shown.

thread the 10" piece of elastic through the casing with a safety pin. stitch casing closed on each end, making sure to catch the elastic in place.

To give the pocket depth we need to add small pleats near each end. (fold the fabric over to make a little pinch) Pinch just enough pleat to match the width of the liner (sorry for the lack of exactness.. I'm not really an exact seamstress, and it doesn't really matter). Line up edges with elastic casing matching the edge of the liner fabric, pin in place. Stitch along the opposite edge of the pocket as shown in both the illustration and picture.


Fold pocket over adding more small pleats close the the corners of each side. Pin and stitch along the sides. (if you want more guidelines as to how big to make the pleats, use the travel size diaper wipes you'll be putting in it as a guide)

Vinyl pockets
- [1st illustration] sew (no pinning on vinyl) right sides together the binding strip to the vinyl. (tip: sew with the vinyl on the bottom, it will feed through your machine easier.)
-[2nd illustration] turn and fold fabric binding strip along the seam edge.
-[3rd and 4th illustration] Fold twice to make a binding. stitch close to the edge. (edges won't match, wider side with outer stitching is the outside). Repeat for other vinyl pocket.


Stitch vinyl pockets to liner matching corners. (if you like to pin... use clothespins while sewing to hold it in place instead) (for easier feeding through your machine, put the vinyl on the bottom) Clip curves and trim close to stitching on vinyl only.

Inside is complete... now to construct the outside.


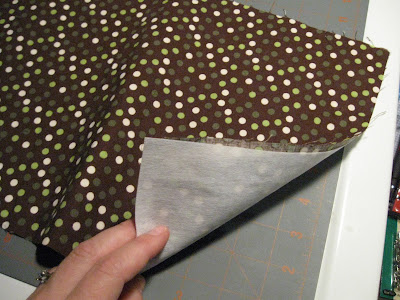
Iron on fusible interfacing to the outer fabric according to interfacing directions.

if you are using a contrasting ribbon stitch along the edges of the ribbon down the middle of length of the outer fabric.

Velcro Tab: (two ways shown)
-Cut about 7/8" hook side of velcro, and about 1 1/4" of the soft side of the velcro.

using ribbon:
cut 3 1/2" of ribbon. Sew hook side of velcro just past the middle of the ribbon. Fold ribbon in half and stitch along the edges of the ribbon.


or using fabric scraps:
cut two pieces of 2" x 1 1/2" contrasting fabric scrap. Sew hook side of velcro onto the right side of one fabric piece about a 1/2" away from the end. With right sides together sew around three sides of both fabric scraps leaving the opposite end (of the velcro) side open. Clip corners, and turn inside out. (you can stitch 1/8" around the edges for a more finished look if you'd like)


pin velcro tab as shown to the middle of the lengthwise end (velcro side up). Pin soft side of velcro in between 5 1/2" and 6 3/4" along the ribbon (or in the middle) as shown. (To double check correct velcro position, fill liner side with diapers and wipes, pin corners together and fold up, checking velcro closure. Adjust accordingly.) sew velcro and velcro tab on.

With right sides together, pin liner and outside pieces together (but not on the vinyl part, pins leave permanent holes in vinyl). You can hold the ends in place with clothespins if you want. Stitch with 3/8" seam allowance leaving an opening along the side, large enough to turn inside out. Clip corners paying special attention to the vinyl (very important! otherwise it will be a nightmare to turn inside out). Then trim vinyl only close to the seam.
turn inside out. Make sure to turn the pockets to the inside, and get the corners tight.
Pin opening closed, and stitch 1/8" seam allowance around the entire diaper holder. (paying careful attention to making sure the hole is closed and vinyl is flat)
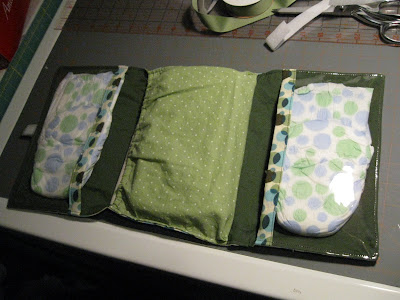
fill with diapers (it is designed to fit 3 diapers of any size, one per pocket) with wipes and changing pad in the middle. You can buy or make your own changing pad. (You just decide on the size, and cut top, and bottom fabrics and vinyl the same size and sew them together with vinyl in the middle, leaving an opening to turn inside out, and then finishing it with a topstitch just like the diaper case once it is turned inside out)

fold it up and you're ready to go!